microcontrollers
Raspberry PI and Arduino Tutorials
| KBS - Home |
|---|
| microcontrollers |
| LED |
| Button |
| RPI Camera |
| LCD Display (16x2) |
| LED Matrix (8x8) |
| 7-segment Display |
| RFID RC522 |
How to install / use the Raspberry Pi Camera
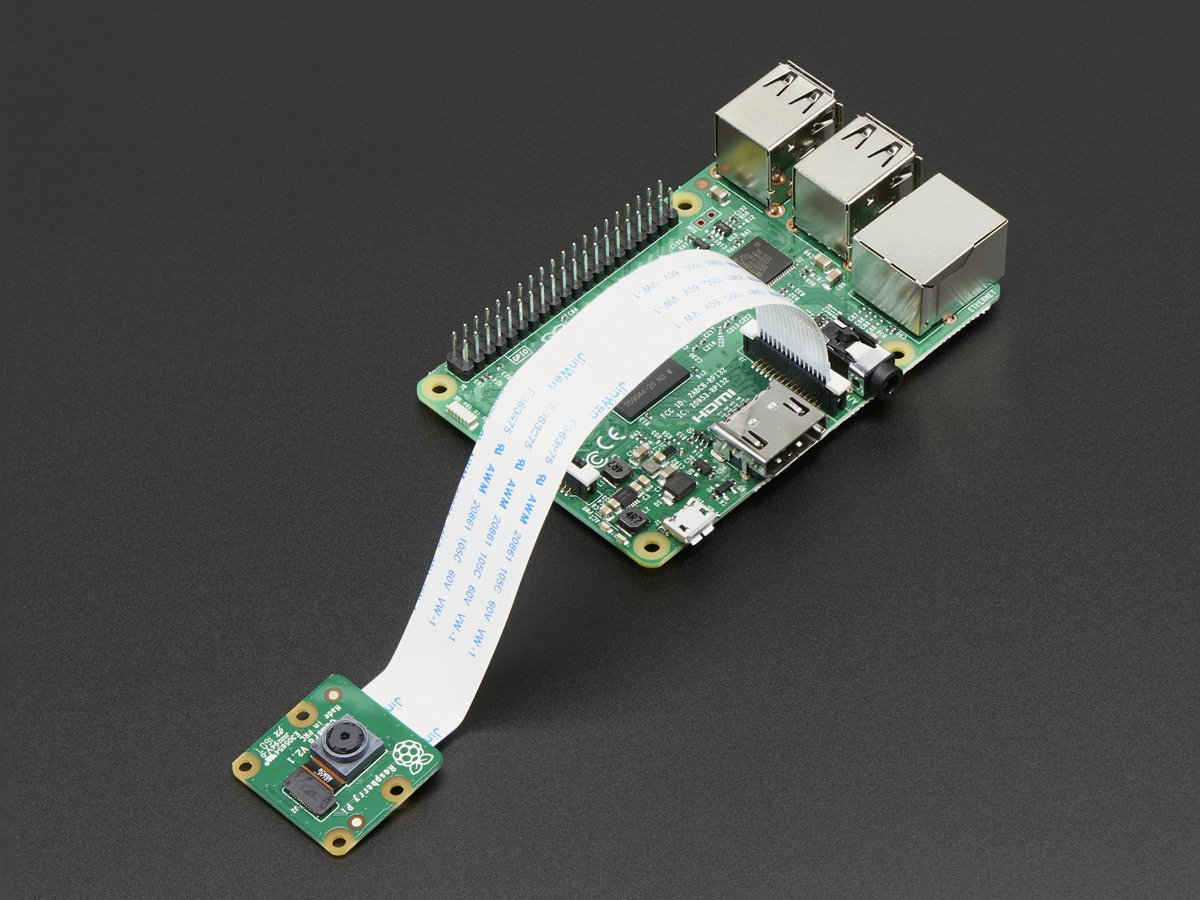
Hardware Setup
Connect the cable as seen below:

Software Setup
It might be necessary to do some updates:
sudo apt-get update
sudo apt-get upgrade
Enable camera
Enable camera interface from the configuration:
sudo raspi-config
Select 5 Interfacing Options and P1 Camera and enable it.
Then you can close the screen and reboot PI.
Command-line interface
Taking a photo
Capture an image in jpeg format with default settings:
raspistill -o image.jpg
Recording a video
Capturing a 10 second video (10000 milliseconds).
raspivid -o video.h264 -t 10000
Capture 30 seconds of raw video at 640x480 and 150kB/s bit rate into a video.h264 file:
raspivid -t 30000 -w 640 -h 480 -fps 25 -b 1200000 -p 0,0,640,480 -o video.h264
The Pi captures video as a raw H264 video stream. Many media players will refuse to play it, or play it at an incorrect speed, unless it is “wrapped” in a suitable container format like MP4. The easiest way to obtain an MP4 file from the raspivid command is using MP4Box.
Install MP4Box with this command:
sudo apt-get install -y gpac
Capture your raw video with raspivid and wrap it in an MP4 container like this:
# Capture 30 seconds of raw video at 640x480 and 150kB/s bit rate into a pivideo.h264 file:
raspivid -t 30000 -w 640 -h 480 -fps 25 -b 1200000 -p 0,0,640,480 -o pivideo.h264
# Wrap the raw video with an MP4 container:
MP4Box -add pivideo.h264 pivideo.mp4
# Remove the source raw file, leaving the remaining pivideo.mp4 file to play
rm pivideo.h264
To play the video you can use omxplayer:
omxplayer video.mp4
Useful links:
Python (picamera)
Install picamera:
- Python 2:
sudo apt-get install python-picamera - Python 3:
sudo apt-get install python3-picameraExamples
Take a picture:
import picamera

camera = picamera.PiCamera()
camera.capture('image1.jpg')
Stop motion
import picamera
from time import sleep

camera = picamera.PiCamera()

camera.capture('image1.jpg')
sleep(5)
camera.capture('image2.jpg')
Video recording:
import picamera
from time import sleep

camera.start_recording('video.h264')
sleep(5)
camera.stop_recording()
Camera Settings:
camera.sharpness = 0
camera.contrast = 0
camera.brightness = 50
camera.saturation = 0
camera.ISO = 0
camera.video_stabilization = False
camera.exposure_compensation = 0
camera.exposure_mode = 'auto'
camera.meter_mode = 'average'
camera.awb_mode = 'auto'
camera.image_effect = 'none'
camera.color_effects = None
camera.rotation = 0
camera.hflip = False
camera.vflip = False
camera.crop = (0.0, 0.0, 1.0, 1.0)
Preview:
You can display a preview showing the camera feed on screen. Warning: this will overlay your Python session by default; if you have trouble stopping the preview, simply pressing Ctrl+D to terminate the Python session is usually enough to restore the display:
camera.start_preview()
You can use the stop_preview method to remove the preview overlay and restore the display:
camera.stop_preview()